
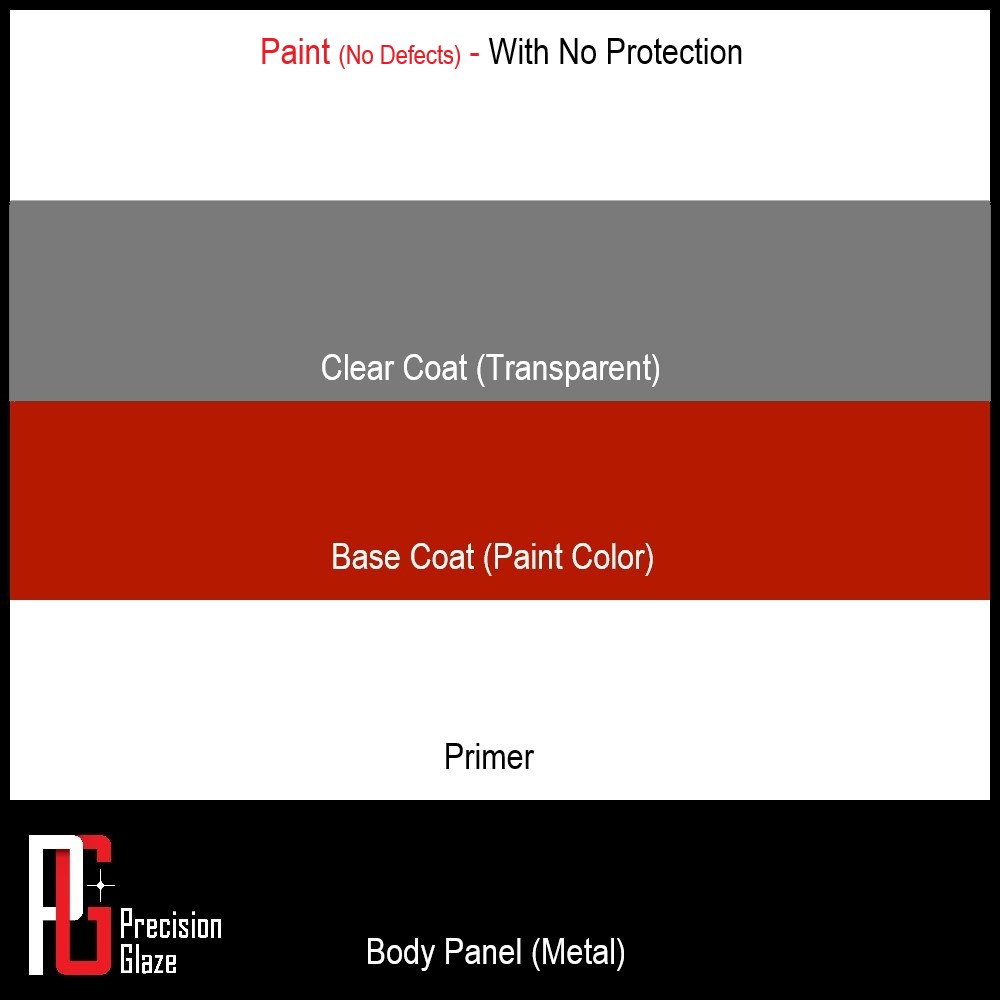
The ideal scenario
The diagram on the right illustrates a perfect scenario (where paint is perfectly flat with uniform thickness, and no defects). It is important to note that paint is very seldom in a perfect state (at a microscopic level), however for the purposes of explaining our detailing services at Precision Glaze, the clear coat layer of paint will be illustrated as a perfect straight line shown in grey.
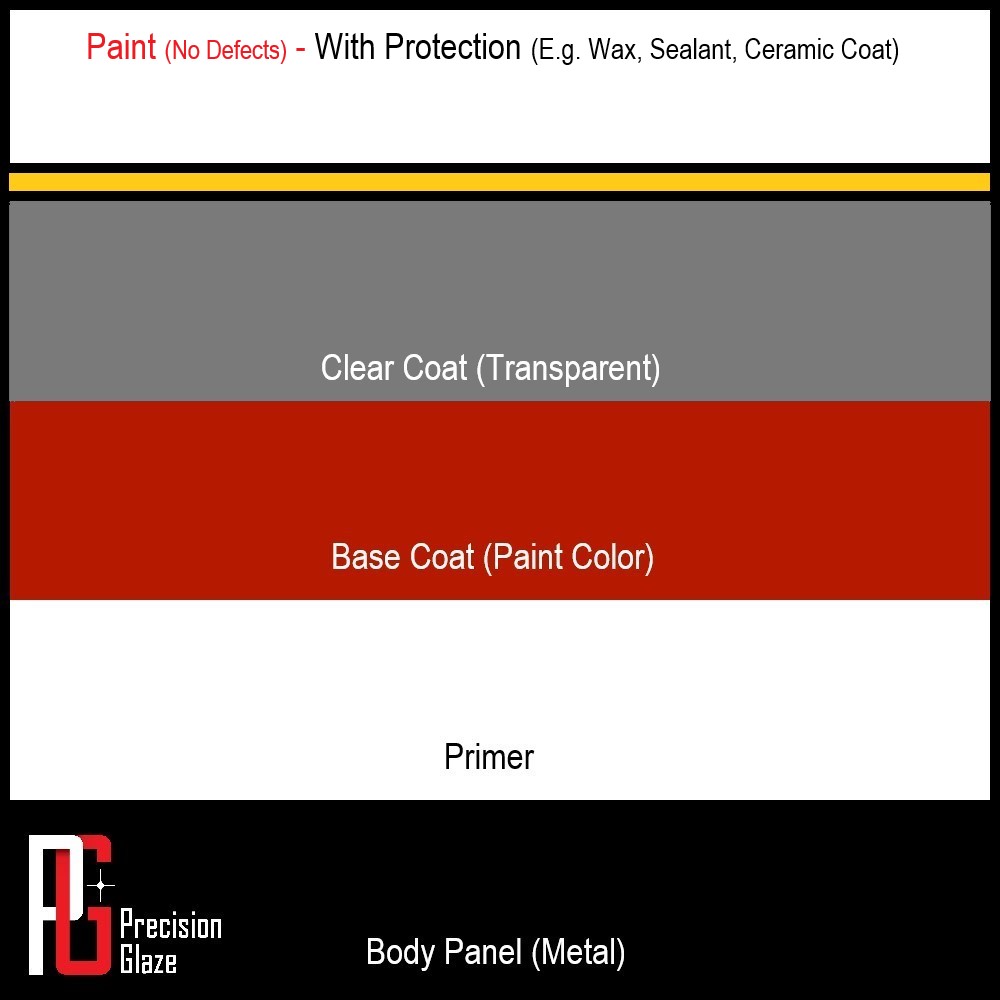
The diagram on the left illustrates how a vehicle’s paint surface can be protected with an application of a wax, polymer sealant or ceramic coating. This thin but strong (and shiny) layer of protection is carefully applied on top of the clear coat and bonds with the surface (shown with a yellow line on the left). Precision Glaze offers a variety of paint protection options including professional ceramic coatings.
Paint Defects (Below the surface)
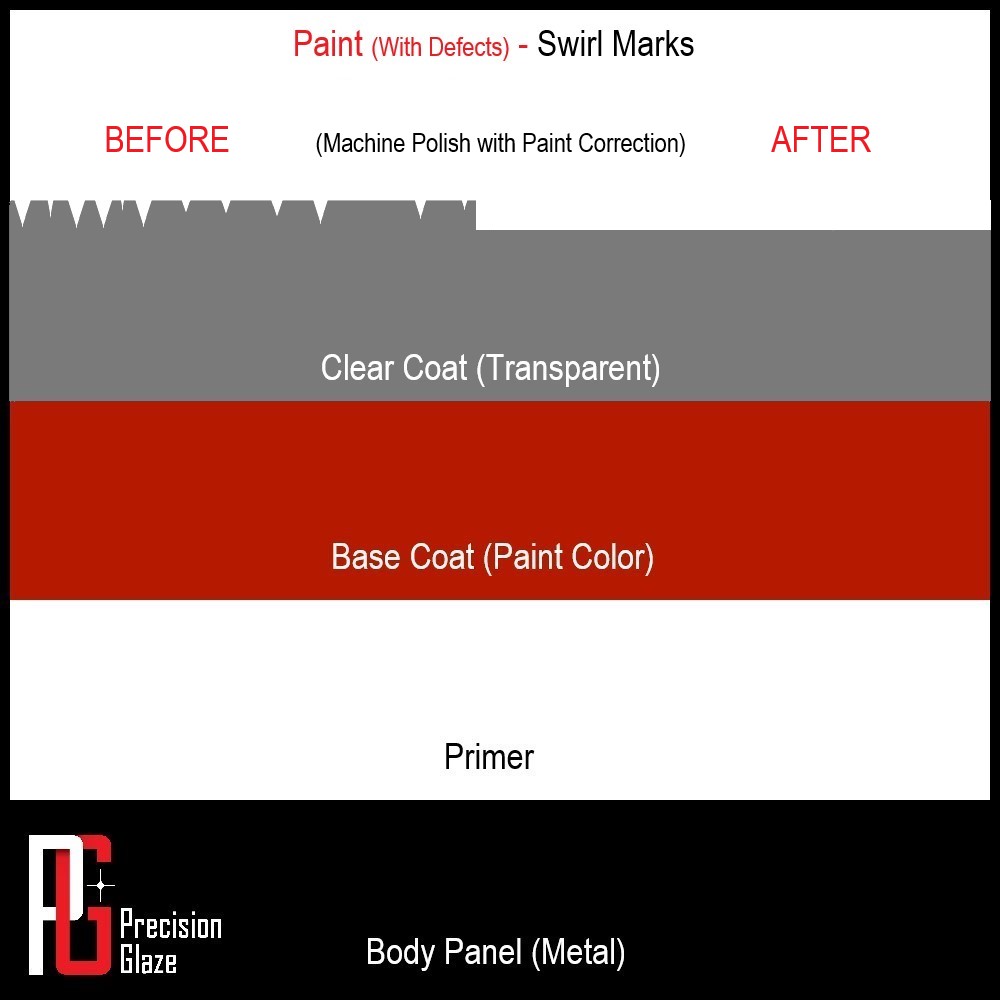
1. Swirl Marks (also known as spider webs), marring etc. refer to paint defects that are in (or underneath) the clear coat layer of paint. As illustrated in the diagram on the right, swirl marks are very fine imperfections that are usually only visible under direct sunlight.

Swirl marks can be corrected through a detailing approach consisting of abrasive compounds and polish. This process often involves removing a very thin layer of the clear coat layer of paint, as illustrated in the diagram on the left.

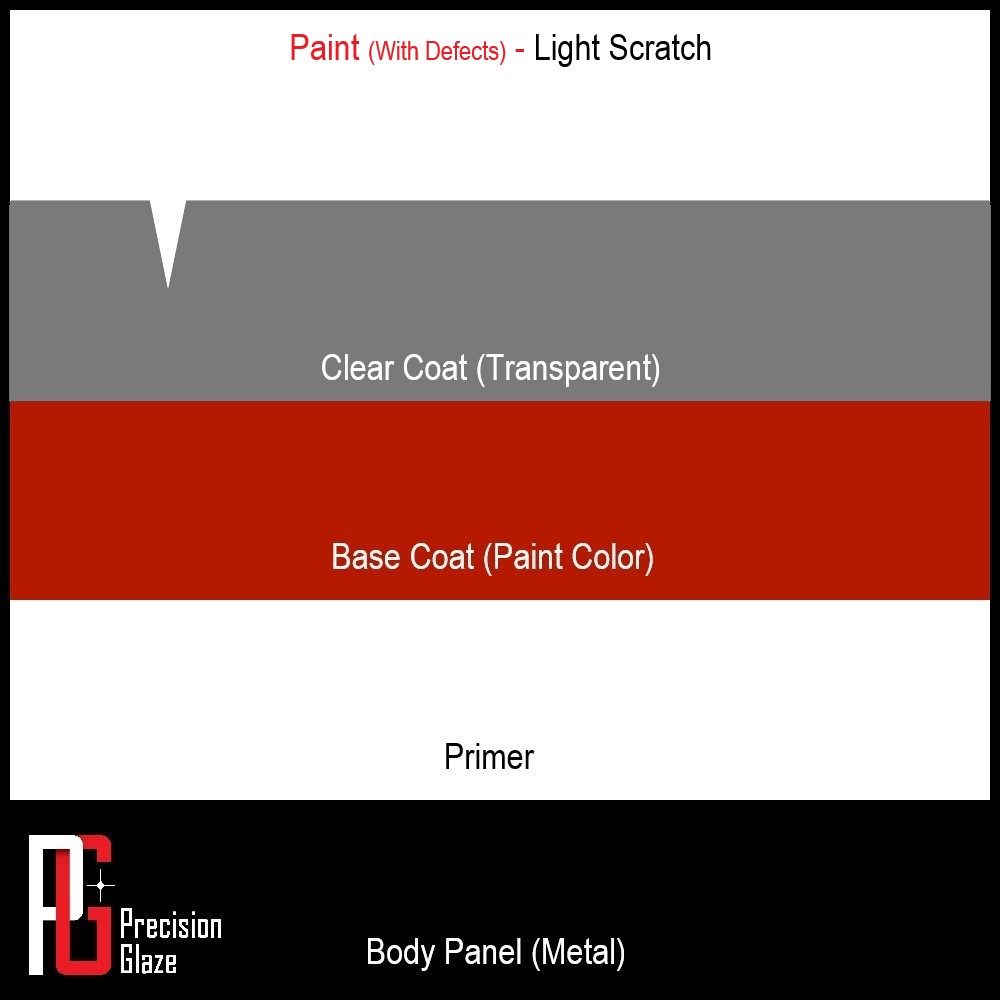
2. Light Scratches refer to paint defects that are embedded in (or below) the clear coat layer of paint. As illustrated in the diagram on the right, light scratches are very fine imperfections that are usually only visible under certain light conditions.
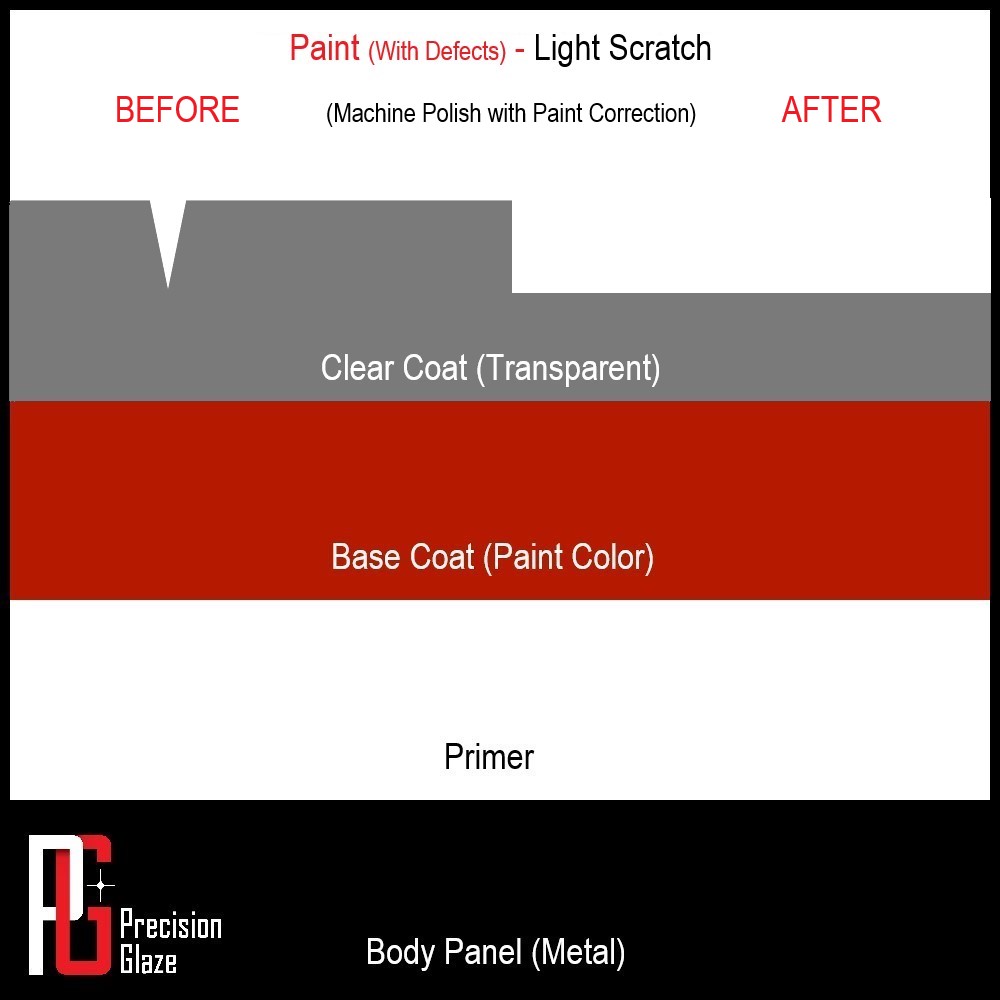
Light scratches can be corrected through a detailing approach consisting of abrasive polish compounds (and wet sanding in extreme cases). This process often involves removing a thin layer of the clear coat, as illustrated in the diagram on the left.
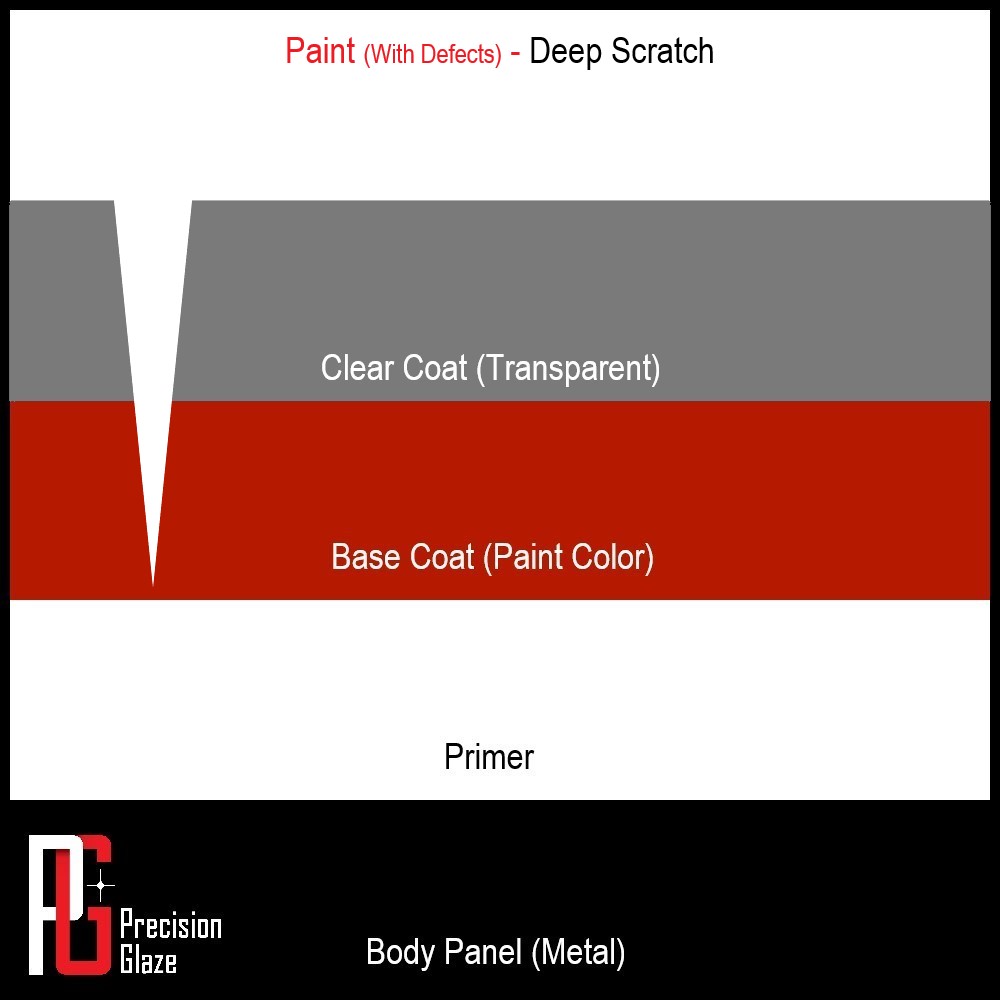
3. Deep Scratches refer to paint defects that have penetrated through the clear coat layer of paint. As illustrated in the diagram on the right, deep scratches are easily visible and can often be felt by carefully running the tip of your fingernail over the scratch (where your fingernail gets caught into the indentation).
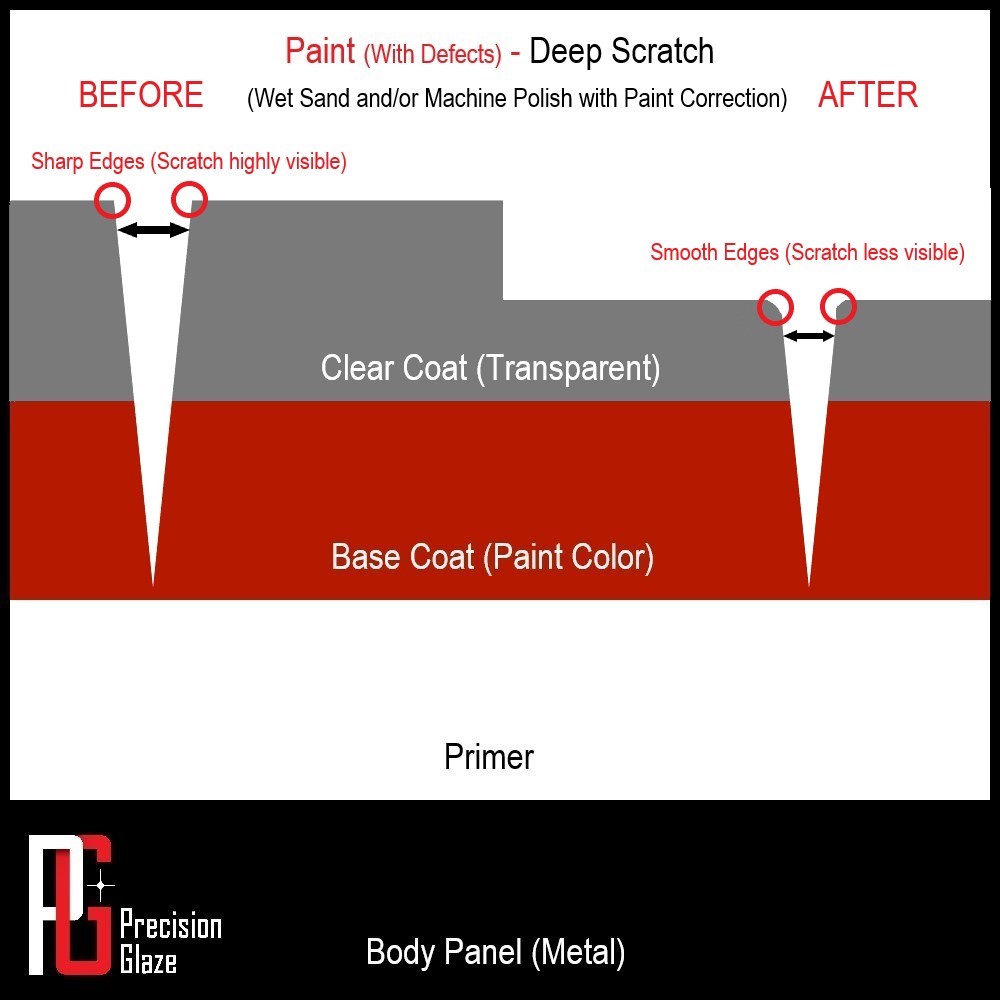
In most cases it is not possible to repair a deep scratch using polish compounds and wet sanding techniques alone because the scratch needs to be repaired (re-painted) at a panel beater. However, using specific detailing techniques, the visibility of the scratch can be drastically reduced (to the naked eye). This process is illustrated in the diagram on the left. Also note that the sharp edges or corners of the scratch are slightly rounded after the paint correction process. It is these smooth round edges that make the scratch less visible to the naked eye as light reflects in and out of the indentation.
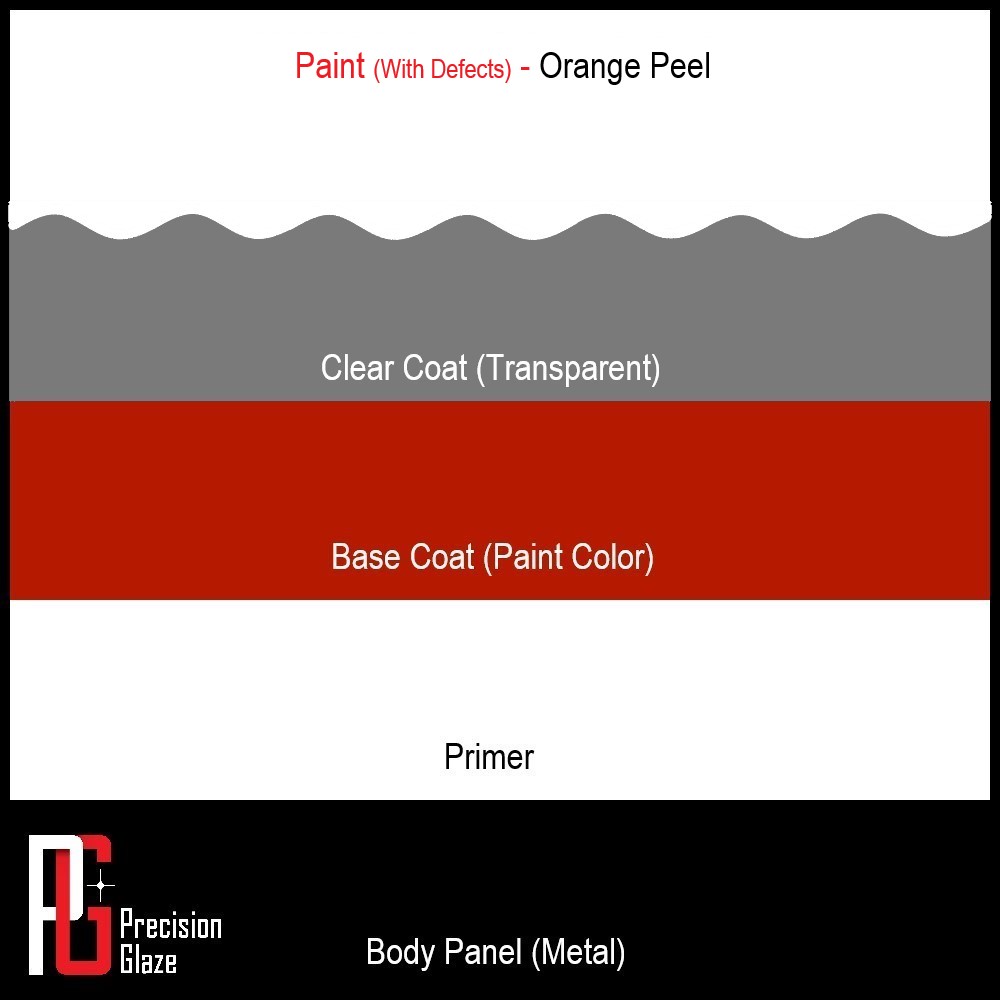
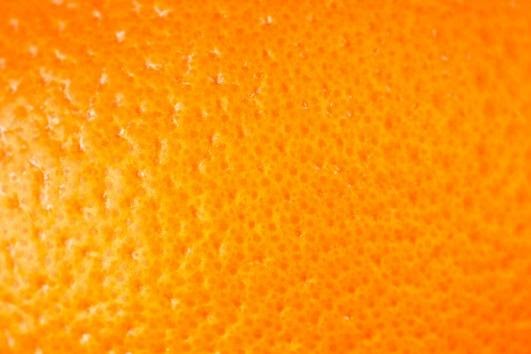
4. Orange Peel refers to a paint defect that occurs during the spray-painting process. The name orange peel is used because the defect looks like the texture of the outer peel of an orange. Orange peel is typically caused by the rapid evaporation of paint thinner, incorrect spray gun setup (e.g. low air pressure or incorrect nozzle), spraying the paint at an angle other than perpendicular, or applying excessive paint. The diagram on the right illustrates the orange peel effect in the clear coat layer of paint.
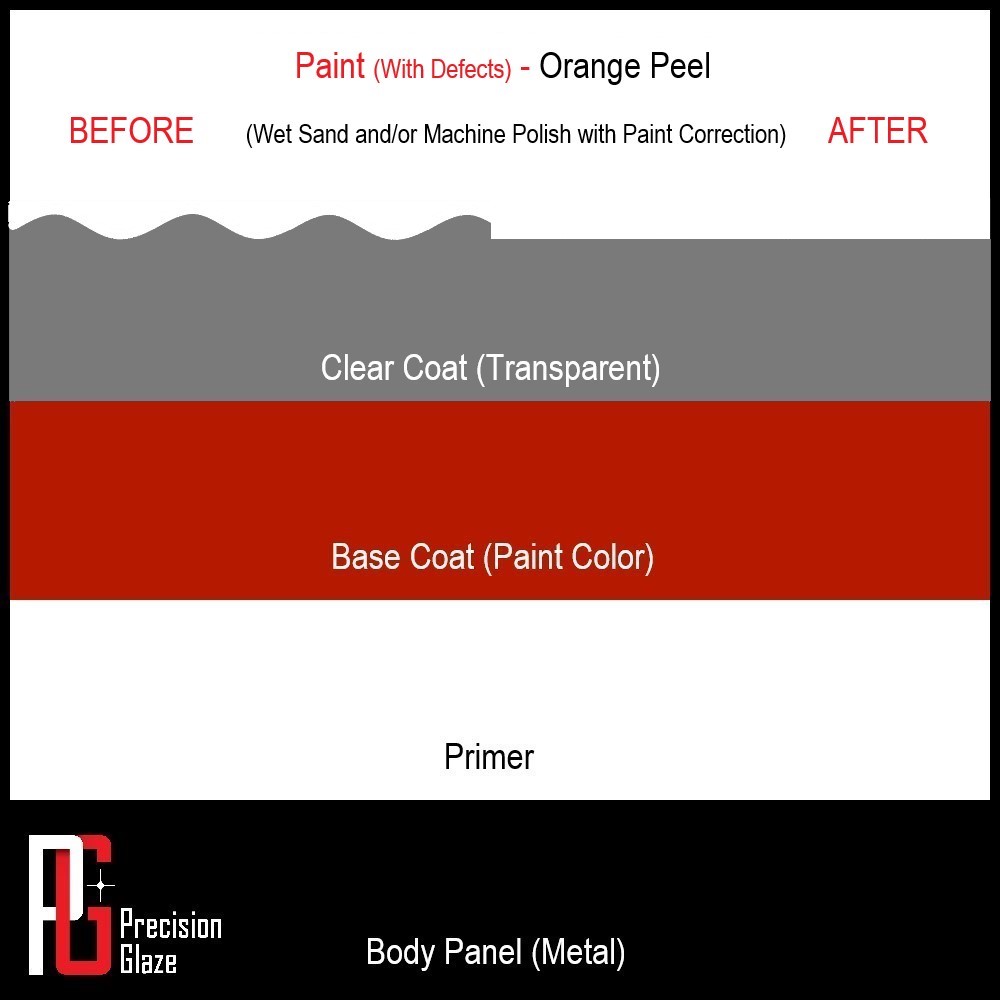
Orange peel can sometimes be refined through a detailing approach consisting of wet sanding and abrasive compound polishing. The diagram on the left illustrates how orange peel can be refined and/or corrected by removing a significant and large layer of the clear coat layer of paint (with high risk of damaging the paint). However, in some extreme cases, orange peel can only be repaired by re-painting at a panel beater.
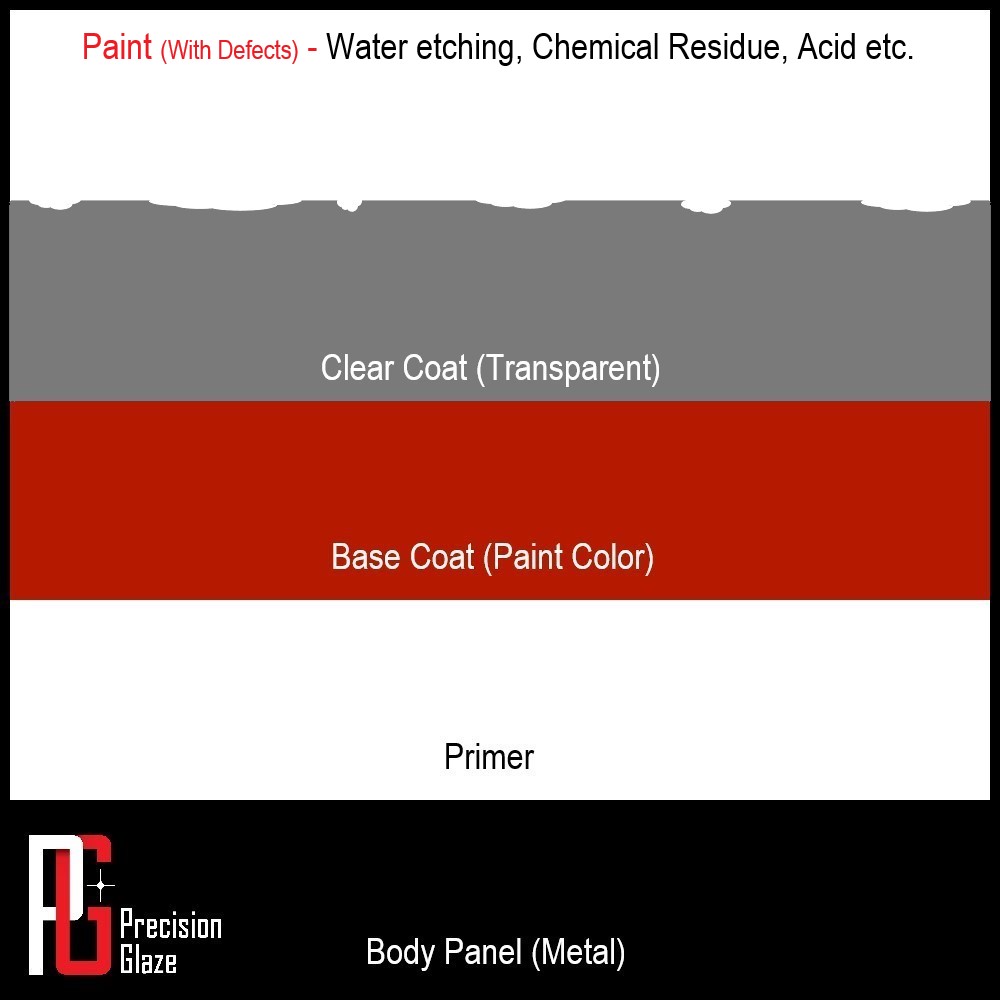
5. Water etching, chemical residue, acid and other harsh mineral deposits sometimes eat their way into the clear coat layer of paint causing permanent damage, as illustrated in the diagram on the right.
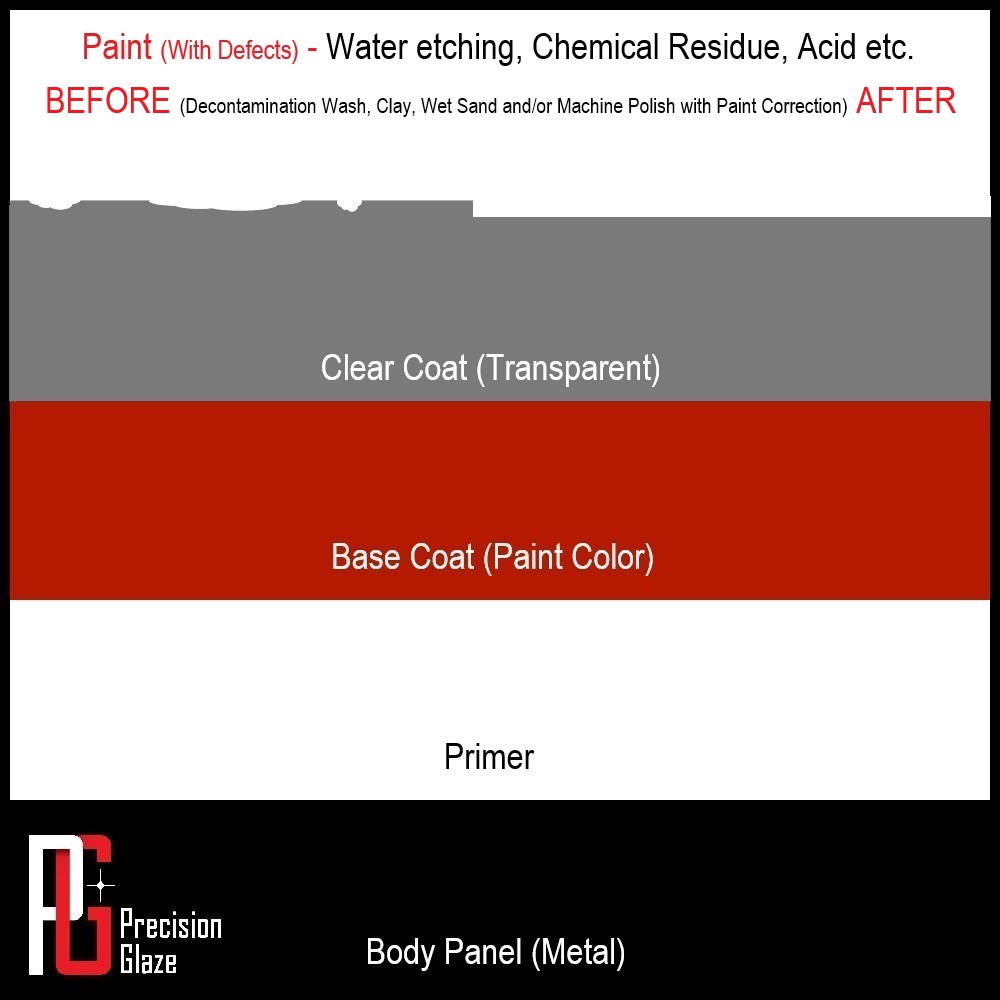
Depending on the extent of the damage, water etching can be corrected through a decontamination process, abrasive compound polish (and wet sanding in extreme cases). This process involves removing a thin layer of the clear coat layer of paint as illustrated in the diagram on the left.
Paint Defects (Above the surface)
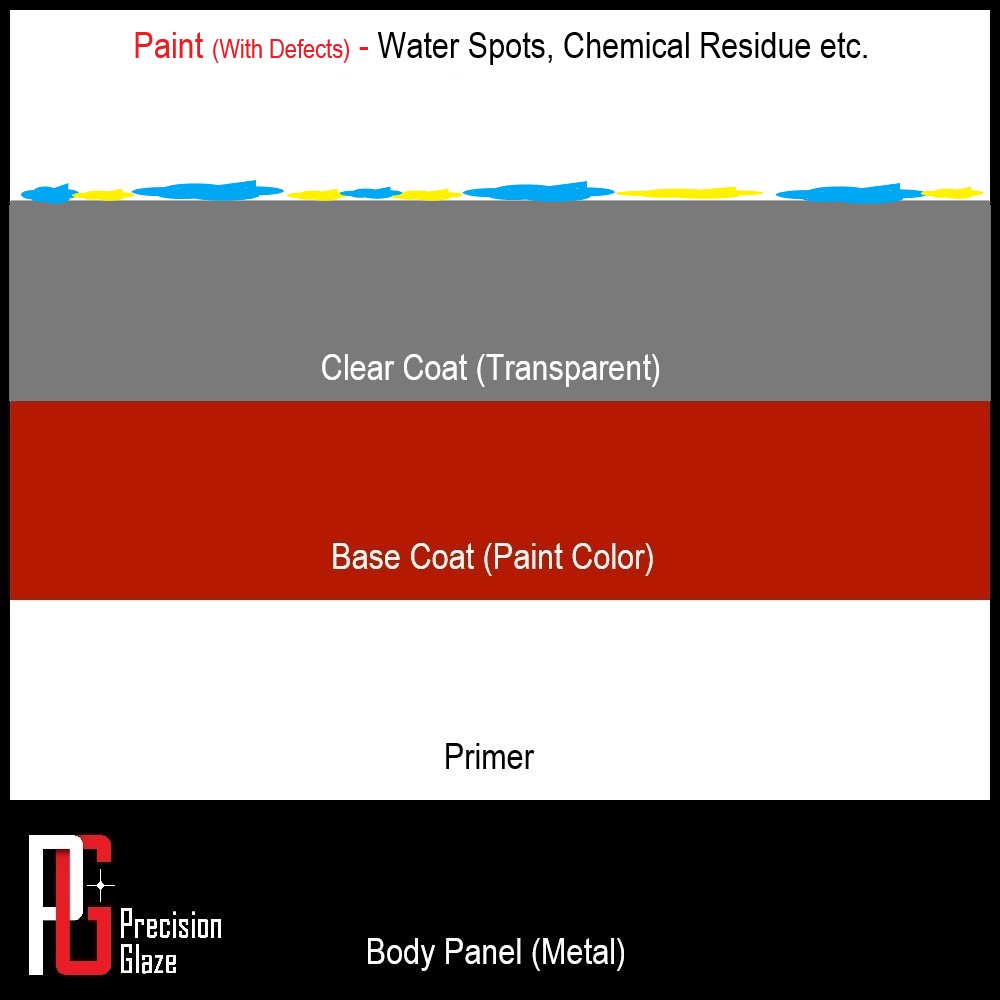
1. Water spots are found on top of the clear coat layer of paint. Water spots are most caused by rain (or other forms of water) that settle on the surface of the paint and is left to dry naturally. This is illustrated in the diagram on the right.

We recommend that water spots be cleaned and removed as soon as practically possible. Often, the longer a water spot is left on the surface of the paint, the more difficult it is to remove safely. The diagram on the left illustrates how water spots can be removed through a thorough decontamination wash, clay application and machine polish.
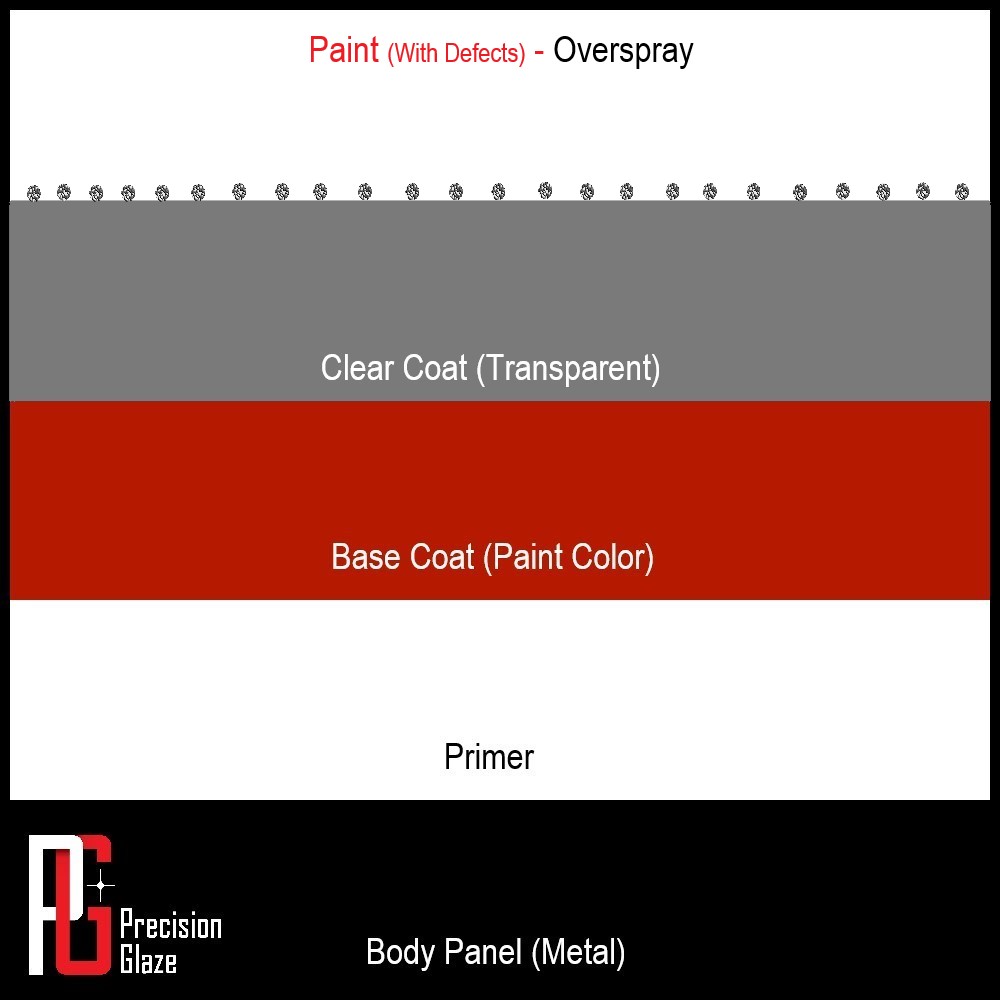
2. Overspray refers to fresh paint particulates (present during a painting process) that settle on top of the clear coat and other surface panels. Overspray cannot be easily washed off the vehicle and leaves the surface of the clear coat with a rough texture (almost like sandpaper). Overspray is illustrated in the diagram on the right.
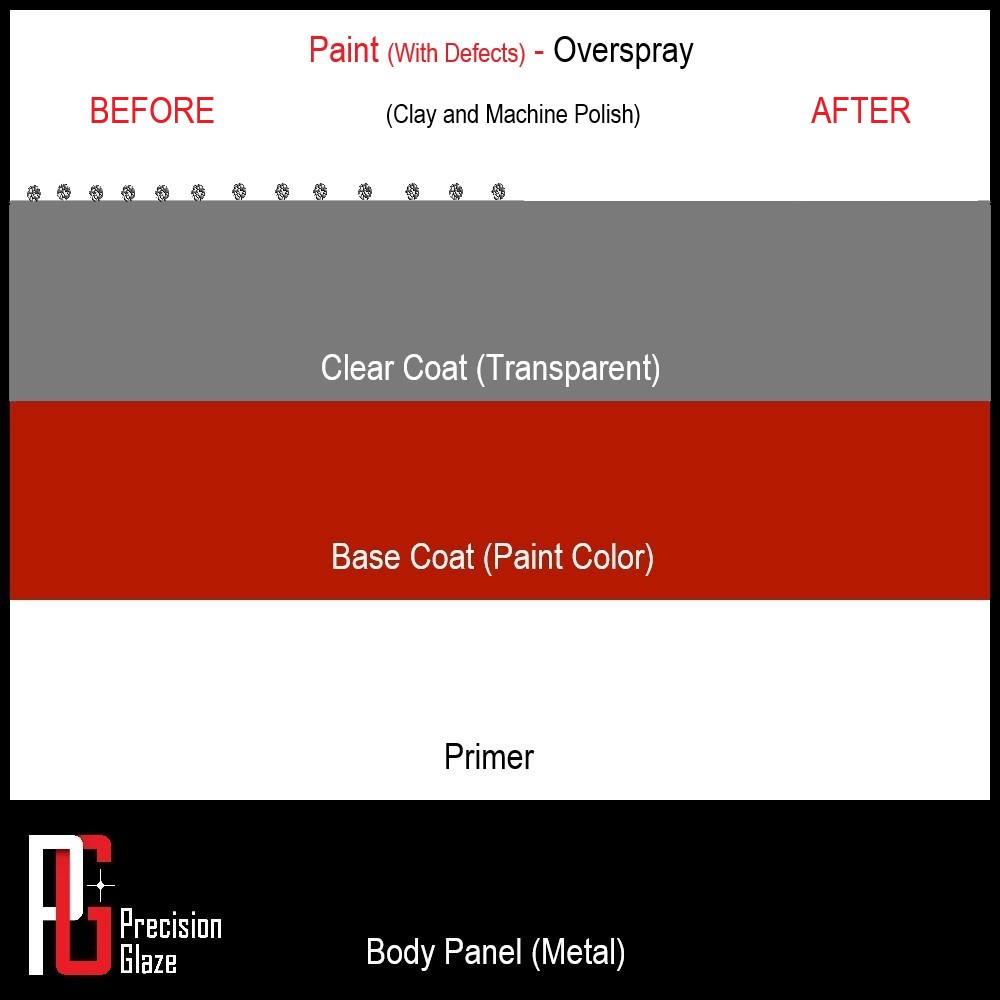
Overspray can often be removed safely using a detailing approach consisting of clay and machine polishing. We recommend that overspray be removed as soon as possible to avoid the use of unnecessary detailing abrasives during the restoration process. The diagram on the left illustrates how overspray can be safely removed without the use of abrasives or harsh chemicals.
3. Contamination such as industrial fall out, bird droppings and tree sap etc. settle on top of the clear coat layer of paint and other surface panels. Often, these types of contamination cannot be easily washed off the vehicle. Contaminants usually result in a rough texture (almost like sandpaper) on the vehicle's surface. Common types of contamination are illustrated in the diagram on the right.


We recommend that contamination be removed as soon as possible to avoid unnecessary damage to the clear coat layer of the paint. Contamination can often be safely removed using a detailing approach consisting of a thorough de-contamination wash, clay application and polish as illustrated in the diagram on the left.